Site Settings And Options
QPilot Site Menu
From QPilot Merchant Center > Site Menu, you can select from the following options:
- Dashboard: Navigate to the QPilot Site's Dashboard to view Scheduled Orders, edit notifications, manage Integrations, and more within the QPilot Site.
- Edit: Manage the General Settings and Options for your site
- Pause / Resume Processing: "Pause Processing" to disable the automatic processing of all Scheduled Orders for the QPilot Site. "Resume Processing" to enable processing (see here for more information).
- Delete Site: Delete the QPilot Site from your QPilot Merchant Account.
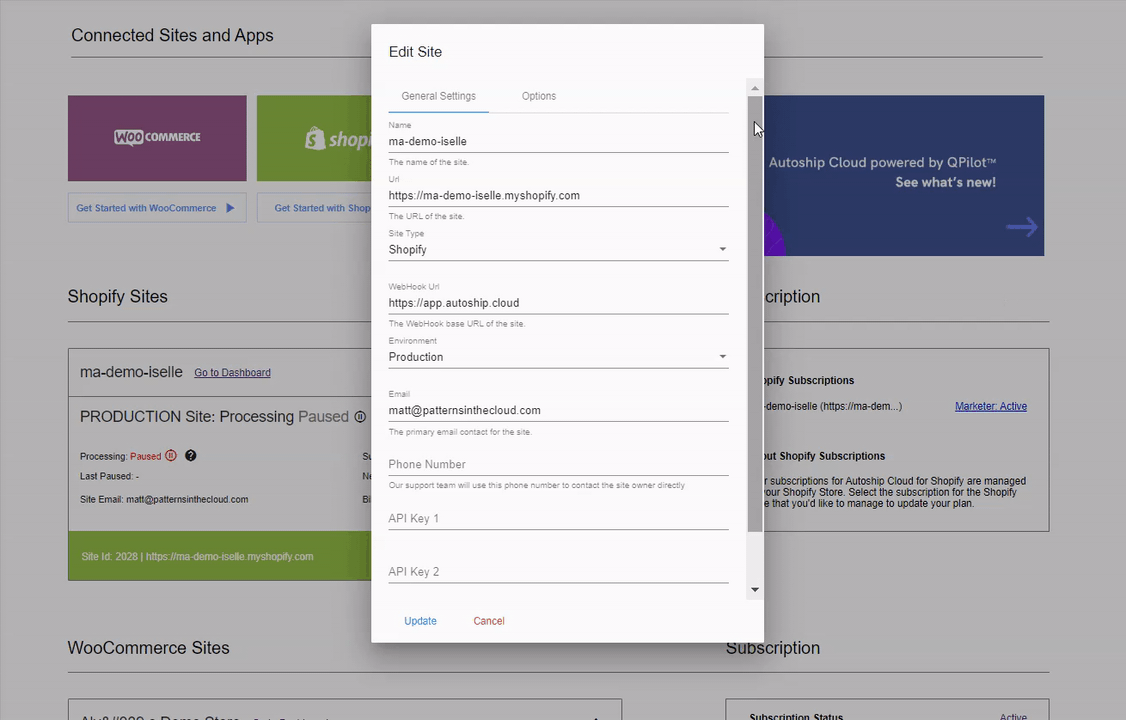
Edit
When you "Edit" your site, you can edit your General Settings.
General Settings
-
Name
- The name of the site.
- Required (but may be set automatically).
- Default: The connected site's Name.
-
URL
- The URL of the site.
- Set automatically.
- This must match the URL of the site that you connected to QPilot.
- Important: Always connect secure URL's (https) to avoid API connectivity issues.
-
Site Type
- Set automatically.
- Options: WooCommerce or Custom.
- Important: Do not change this setting unless instructed to do so.
-
Environment
- Default: Test Environment
- Test Environment
- Used to connect test/staging sites.
- Cannot be changed unless the QPilot Merchant Account is activated with a Trial or Active Subscription Plan.
- Limitations on Payment Settings (Test Mode Only) for Automated Processing.
- Live Environment
- Used for websites in Production.
- Enables full control of Payment Settings (toggle on/off Test Mode) for Automated Processing.
-
Email
- The primary email contact(s) for the QPilot Site.
- Email(s) will receive admin notifications from the QPilot Site about any issues regarding Scheduled Order Processing Errors as well as direct notifications from QPilot Customer Success.
- Multiple emails can be entered here as comma-separated values.
-
Phone Number
- (Optional) Phone number that QPilot can use to contact merchants with regarding site issues.
- Learn more here: User & Site Contact Phone Numbers.
-
API Consumer Key
- Set automatically.
- The connected site's REST API Consumer Key.
- Important: Do not change this setting unless instructed to do so.
-
API Consumer Secret
- Set automatically.
- The connected site's REST API Consumer Secret.
- Important: Do not change this setting unless instructed to do so.
-
Customer Facing Scheduled Orders URL for the Site
- Defaults to the URL of the site "https://mysite.com/my-account/scheduled-orders".
- If you would like to change the default value, please input a relative URL (e.g. /my-account/scheduled-orders) that is the specific destination for customers to view their Scheduled Orders.
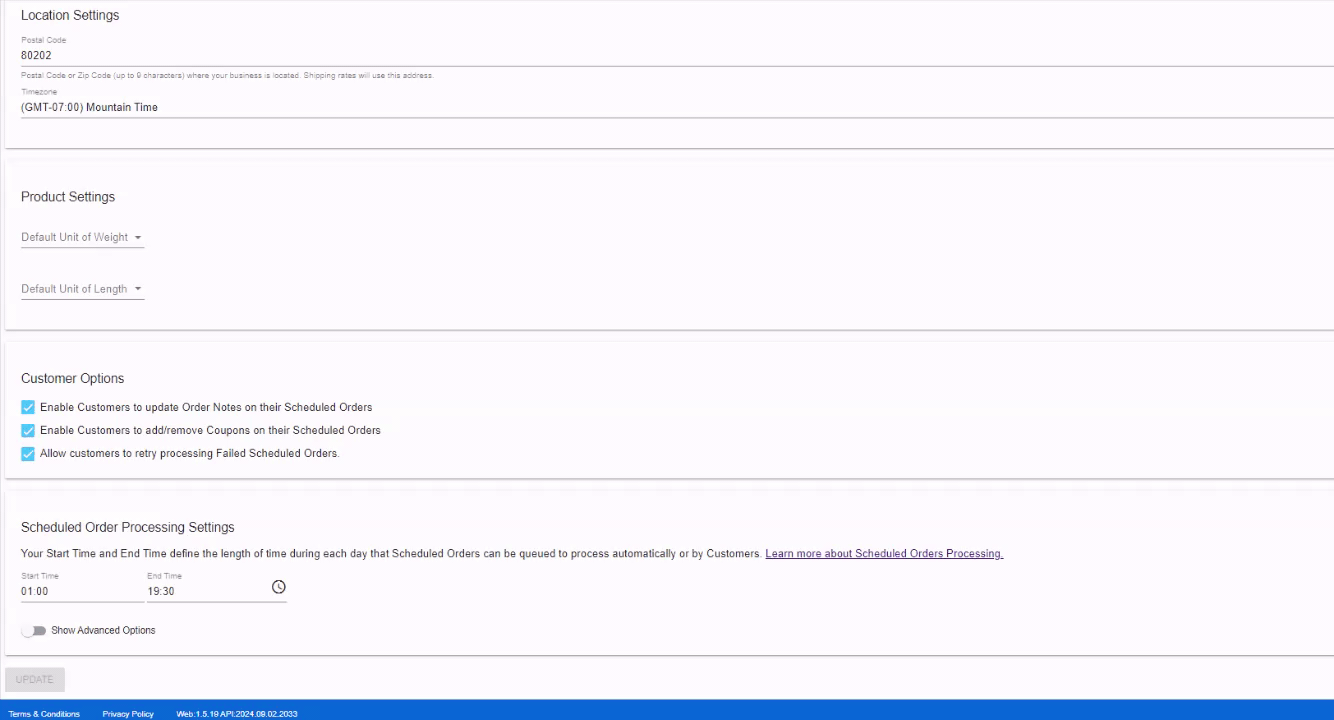
Site Settings
Additional Site Settings can be found in your Site Dashboard > Settings >> Site Settings.
-
Location Settings
- Postal Code
- The Postal Code (aka "ZIP Code") from which your Products are shipped.
- Timezone
- Select a timezone for the QPilot Site.
- If no Time is selected, the default is GMT time (UTC 0).
- Currency
- Select a default site-wide currency.
- If a currency isn't specified in a Scheduled Order, the default will be applied.
- Postal Code
-
Product Settings
- Default Unit of Weight
- Default is "Pound".
- Select a value to control the unit you will define Product Weights in:
- Pound, Ounce, Kilogram, Gram.
- Suggestion: This should match the Weight Unit selected on your connected site.
- Default Unit of Length
- Default is "Inch".
- Select a value to control the unit you will define Product Lengths in:
- Inch, Foot, Yard, Millimeter, Centimeter, Meter.
- Suggestion: This should match the Length Unit selected on your connected site.
- Default Unit of Weight
-
Customer Options
- Enable Customers to Update Order Notes on Scheduled Orders
- Enable this setting to include Order Notes (optional) entered by customers during checkout in the created Scheduled Orders.
- Enable customer to add notes when managing their Scheduled Orders.
- Merchants can always edit Order Notes within Scheduled Orders. This setting enables the option to be customer-facing as well.
- Enable Customers to use QPilot coupons on Scheduled Orders
- Enable this setting to display a Coupons field on Scheduled Orders that your customers can use to add/remove Coupons.
- Merchants can always edit the Coupons applied to Scheduled Orders. This setting allows customers to add (QPilot) coupon codes (provided by merchants) to their Scheduled Orders.
- Learn more about QPilot Coupons.
- Allow Customers to Retry Processing Failed Scheduled Orders
- Enable this setting to display a link in your customer's Scheduled Order error notifications, so your customers may easily fix issues and retry processing their Scheduled Order instantly.
- Merchants can always retry processing Scheduled Orders, even with this setting disabled.
- Enable Customers to Update Order Notes on Scheduled Orders
-
Order Processing Start Time
- Select a time for your QPilot Site to begin processing Scheduled Orders each day.
- QPilot will automatically set the Next Occurrence time of newly created Scheduled Orders to the Processing Start Time.
- The time set will be local to the timezone set above.
- If no start time is defined, Scheduled Orders will process relative to the time they were last updated.
- Select a time for your QPilot Site to begin processing Scheduled Orders each day.
-
Scheduled Order Processing Settings
- Order Processing Times
- Select a time for your QPilot Site to end processing Scheduled Orders each day.
- The time set will be local to the timezone set above.
- Must be selected if a Processing Start Time has been selected.
- Advanced Options
- Scheduled Order Offset Processing
- Set a number of days prior to the Next Occurrence Date you want the Scheduled Order to process.
- Learn more about Offset Processing Scheduled Orders.
- Note: Your customer will see the Next Occurrence Date without the offset processing adjustment, but once entering their processing offset customers will see the Scheduled Order as "Processing".
- Scheduled Order Offset Processing
- Lock Duration (Days)
- Define a number for how many days prior to processing will customers be unable to alter their order. Leave blank to disable Scheduled Order locking.
- Once Scheduled Orders enter their lock window, customers will see the order as "Processing".
- Learn more about Locking Scheduled Orders.
- Order Processing Times
Updated 2 months ago
Did this page help you?